BLOG
How To Get More Visits With Your Orbit CMS Blog Module
In a post penguin/panda world - epic content has never been more critical.
With this in mind we released a major update to the Orbit CMS blog module earlier this year. Adding awesome content to your site in an interactive and conversational format has never been easier.
The rationale behind this update was to allow Orbit CMS users to effortlessly create great blog content, while having complete control of basic SEO elements; no need to worry about any technical SEO or any stuff like that, we baked most of this into the blog module already. The blog module is now quite similar to an optimised WordPress install with all the best SEO plugins, minus the negative impact on your site speed. This allows you to focus and get on with the more important task at hand - creating content your users love.

We all get busy and you're forgiven if these features slipped under your radar unnoticed. But from now on no more excuses. Run through this simple checklist to ensure when you click publish on your new post, your onpage SEO is tight.
Optimising the onpage SEO is super simple in the Orbit blog module. There are two tabs you want to pay attention to:
- The Advanced Tab
- The Optimise Tab
These two tabs aren't actually as intimidating as they sound.
1. The Advanced Tab (Which Isn't Really Advanced At All)
When you are done writing your content, you want to click the advanced tab and complete the two following fields.
Post Introduction: This is the intro paragraph that appears on your blog and category landing page. If you don’t fill this out, the blog module will automatically pull in the intro of your post for you. However it is worth writing an intro here and crafting an enticing intro that encourages users to click-through and read your posts. The reason this option is good for SEO is it reduces the amount of duplicate content blogs often suffer from. This is prevented by having unique text on blog landing pages e.g /blog or /category when you fill this out.
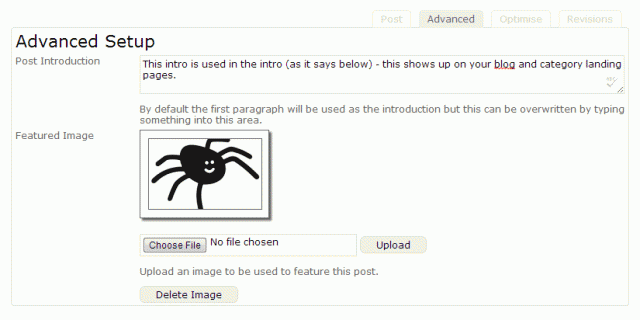
Featured Image: You also want to upload a featured image to your new post. For demonstration purposes I have added a picture of a spider which you can see again on the blog landing page. If you don't add a featured image the blog module will try to pull through a resized image you used in the blog post you publish. This featured image shows up on the landing pages the same as the post intro, but also serves another important purpose; adding a featured image allows your post to show up at the bottom of the page under the related posts section.
Why is this important you ask? Well one it encourages readers to stick around and read other related content on your site. This can help increase your pageviews, reduce your bounce rate, and creates smart internal links allowing more page rank to flow to related pages on your site - thus improving their visibility.
2. The Optimise Tab (Nail That Onpage SEO)
Next you'll want to check out your optimise tab. Here you can tweak your onpage SEO to your heart's content.
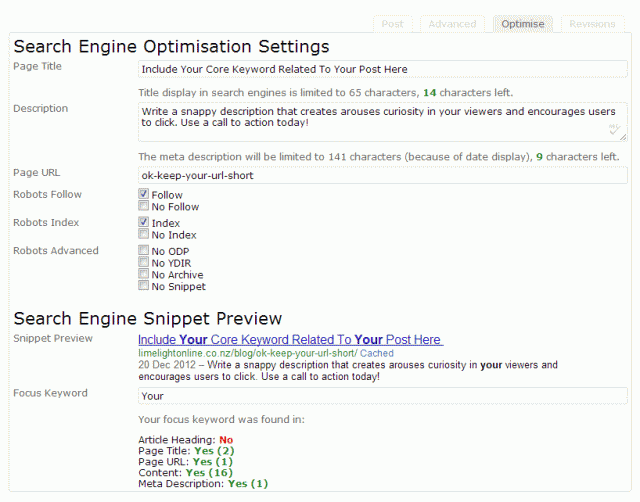
I'm not going to go into great detail for onpage optimisation. It's pretty straight forward and there are gazillions of articles published on the topic already. You can see from the above screenshot pretty much how it should look. If you are new to SEO and just learning you could maybe start with downloading Google's own SEO starter guide (PDF download) to learn the basics.
Running through the options briefly - here is the minimum you'll need to know and complete for basic onpage SEO:
- Page Title - This shows in the search results and tells users (and search engines) the contents of the page. Do include a keyword or two but don't keyword stuff it! We included a handy character counter so you know what is an ideal title length for SEO. If the title is longer than 65 characters, Google will cut of the end of it and your title will become truncated in the search results.
- Description - This is the page's meta description which gives a summary of your page. This displays below the title in the search results pages. Again, it could be useful to include a keyword or two in here as they will be bolded when relevant to a users search query. Again don't stuff - you'll only do harm. We included a character count on the meta description too so you know you're on track.
- Page URL: This is the url of your blog post and what appears in the address bar of your browser. This will be auto generated from what you named the post. The module removes most common stop words from the URL automatically, but you might want to edit this one down from time to time. Again good idea to slip in a keyword as the URL gives users and bots hints to what a page is about. Shorter is better for urls.
- Robots Follow
- Robots Index
- Robots Advanced

Bonus Tips
Two more options you will want to take note of:
Categories: On the right hand side of your blog dashboard you will notice the categories tags. Try keep your post in one or two categories max to keep duplicate content on your site at a minimum. If you try to add more than three categories the blog module will shake its fist angrily at you. Actually it won't. It will give you a warning though.
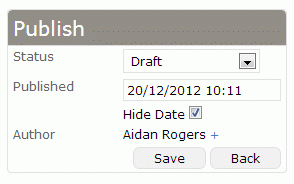 Published: This feature is easy to miss but very useful. In the 'Publish' box you will notice a small + symbol next to the published date. Not only can you edit the published date, you can actually hide the date altogether. Generally when you publish topical, timely content you would not change this option, as people want to see fresh content, so this includes the date of your post in the search results. However from time to time you may create evergreen content. This type of content doesn't really change or go out of date, maybe a how-to, a tutorial or a buyers guide, something that will be still useful and relevant in years to come. If you are publishing evergreen content this is a good time to switch the date option off.
Google Authorship Markup
The final and most important SEO feature for future proofing your site in 2013 - the Google Authorship Markup feature in the Orbit CMS module. This gets your pretty little face featured next to your content in Google's search results. You can learn all about Google Authorship and why its super important here. I may write about this next time, so do subscribe to our newsletter to be updated when it's published.
Hope you learnt something about improving the onpage SEO in Orbit.
Now get optimsing those blog posts!


