

BLOG
How To Guide: Selecting and Preparing Images for Your Website
Photography, logos and other imagery are a crucial component of your website. Not only can imagery bring your products to life and convey emotion, but they also reflect your brand and personality. As such, it’s important that you give this aspect of your website due consideration and select images that are beautiful and appropriate for each page of your site.
The process of choosing and formatting images for your website isn’t complicated, but there are a lot of aspects to consider. We have created this guide to make the entire process simple and confusion-free. Simply follow the steps we’ve outlined below and you’ll soon have the perfect images for your website!
Step 1: Select your images
The first step is to select images that you’d like to use on your website. We suggest asking your designer to provide a brief that recommends the most appropriate types of imagery for your particular site. Your designer may include suggestions on subject matter, colours, sizes and text overlay considerations. Designers know that imagery can make or break a website, so most designers are more than happy to provide this brief and review prospective images after you have selected them.
Once you have the brief, you should look through your own catalogue of images or browse an online stock photography library. In many cases, it is advantageous to have unique photographs or specific images of your products or team. If you don’t have these already, you may wish to consider staging a photo shoot to get the exact images you need. In other cases, stock imagery may be suitable for your needs. At Limelight Online, we most often select images from iStock and Shutterstock. These industry favourites are known for offering top quality images at reasonable prices.
PRO TIP #1: Start the image selection process as early as possible
You can begin this process as soon as your designer provides you with the designs for your website. It’s a good idea to begin the image selection process early because it can take longer than you think to find the right images. If you select images early enough, your designer may be able to incorporate them into the designs so you can get a feel for your selected imagery from the start.
Step 2: Edit and crop your images
The next step is to edit and format your images so they look great within the design. You may wish to edit the images to slightly change their colour or remove an unwanted element. You will also need to ensure that the images have the correct aspect ratio for the selected area of the website. If you don’t size your images correctly, they may look distorted or get cropped awkwardly when they are uploaded to your website.
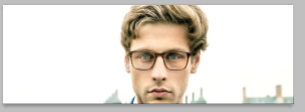
To ensure that your images look the way you intend, it’s best to crop them yourself. Below is an example of what can happen if you don’t crop the images ahead of time. Image 1 is an original image that was selected for a horizontal website banner. After it was cropped by our developer and uploaded to the website, the image looked pretty strange (Image 2) because it only shows the model’s head. In this case, we would usually recommend selecting another image with more appropriate dimensions for this spot on the page.
Image 1:
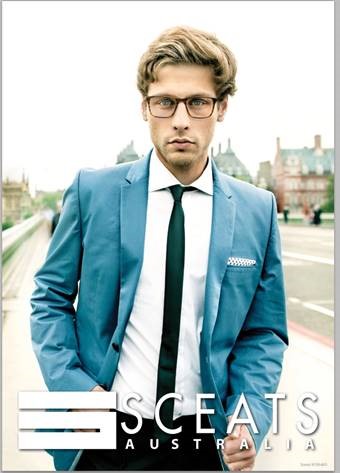
Image 2:
Retina (pixel dense) images
If you’ve been asked to provide images that are “retina ready” or “pixel dense,” then you’ll need to provide your image in twice (or even four times) the size of what was originally asked for. We’ll save the long and technical explanation for a future post (stay tuned!), but essentially providing these pixel dense images will ensure your site looks sharp and crisp on today’s modern devices. For example, if your designer says your banner is 500x200 pixels, then you’ll need to provide the banner at 1000x400 (twice the size) or ideally 2000x800 (four times the size).
PRO TIP #2: Take advantage of online editing tools
There are a number of online photo editing tools that allow you to quickly and easily edit photos. One of our favourites is PicMonkey, a free tool for editing and cropping photos. It’s so easy to use that even the least technical among us can start editing photos right away. With PicMonkey, you can see what your image will look like after it is cropped so you can make adjustments before saving the final version.
PRO TIP #3: Crop images to draw attention
Cropping images isn’t just about ensuring the dimensions are right for the selected area. It can also be used to draw viewers’ eyes to important parts of the image or page. For example, if you have an image of a person on the right-hand side of your website, then you may want to crop the image so the person appears to be looking at the website text on the left. This can help balance the page while drawing the visitor’s attention to important text.
PRO TIP #4: Mind your width
Keep an eye on your image dimensions. If you’re unsure about the appropriate dimensions for your images, your designer should be able to supply them to you. In general, you’ll never need to have an image that is bigger than 1980 pixels in width – anything wider than this will unnecessarily increase file size.
Step 3: Save the image in the right file type and size
Now that you have your final image ready to go, it’s time to save the image in a size and format that is appropriate for the web. The goal is to have the smallest file size possible without compromising image quality. This is done by saving your image at the right resolution and selecting the best format for that image.
Image format
Almost all images used on the web are saved in JPEG, GIF, PNG or SVG format. These are considered universal image formats and can be viewed in all web browsers. Here is a quick summary of each file type:
- JPEG (.jpg): The JPEG format is an ideal choice for photographs because it is good at compressing images with many colours and smooth transitions. It’s not a great choice for images that have sharp edges or busy textures, such as logos and graphics.
- PNG (.png): PNG is a good format for images that have fewer colours and bigger areas of identical data, such as logos and other design elements. It’s also the best choice for images with transparencies (e.g. a background image). In general, PNG is not a good choice for saving photographs and is seen far less often then the JPEG format on the web.
- GIF (.gif): GIF was a popular format in the early days of the web, but today is used most often for animations. It efficiently compresses images, but tends to give images a posterised effect because it has a 256-colour limit.
- SVG (.svg): The SVG format is an excellent choice for logos or other graphics that need to look sharp and crisp on any device, including high-resolution screens (e.g. retina displays). This file format is typically created from vector programs, such as Adobe Illustrator. SVG is only used for displaying logos or icons and is never used for photography of any kind.
You may occasionally come across an image format that we haven’t mentioned here, such as TIFF or BMP. Since JPEG, PNG, GIF and SVG are the best formats for the web, ensure that your image is saved as one of these before adding it to your website. Ask your developer or designer for help if you have any doubts about which file type to use.
PRO TIP #5: Always save your image in RGB
Most of the images you encounter will have the RGB colour profile assigned to them. Occasionally, however, you may run into an image that has been saved with a CMYK profile, especially if the image was originally created for printed material. If you encounter a CMYK colour profile, be sure to modify the image so it’s saved as RGB. This is important because some older browsers cannot display CMYK images.
Image resolution
When you save your file you also need to select the appropriate resolution for that image. Resolution refers to the amount of detail included in an image; images with a higher resolution will be larger in size which translates to slower loading times on your website. As such, it’s better to use a smaller resolution when saving images for your website. If an image needs to be printed, then it should be provided at a higher resolution (preferably via a link to download the image). In general, you should follow these guidelines:
- For web, save at 72
- For printing, save at 300
Again, if you have any questions about the right resolution for your images, ask your developer or designer before saving your images.
PRO TIP #6: Take advantage of “save for web” options
Photoshop and other popular image editing tools often have a “save for web” option. When you select this option, your image will automatically be compressed to a size that is appropriate for use on a website.
PRO TIP #7: Get feedback on a few images first
If this is your first time saving images for the web, it’s a good idea to get feedback from your designer/developer on the first few images that you save. This way if you make a mistake with the file format or resolution, you can go back and correct a handful of images, rather than having to modify all of your images. Once you get a feel for saving images for the web, you can start working in bigger batches.
Step 4: Review and modify
Once you have images ready, you need to look at them in their final destination. Depending on what you have agreed upon, you should upload the images via your website’s CMS or deliver them to your developer to be uploaded. Then, review the images to ensure they look great on the page. If you see any issues with image quality or how they are cropped, you’ll need to revisit the image and make changes until it looks perfect.
Are you ready to get started?
We hope you’ve found this guide helpful. If you’re new to the process, you may find it a bit cumbersome at first, but you’ll quickly become an absolute pro at creating amazing imagery for your website! Don’t forget that we’re here to help, so if you run into any problems along the way, please do not hesitate to reach out to your account manager, designer or developer for help.

Related posts


- March 2024: Google algorithm update - A crackdown on low-quality AI generated content
- GA4 - Where to Start?
- Compulsory shift to Responsive Search Ads coming in June
- What are Google Ads keyword match types and how are they changing?
- How do I get my business to show up on Google? Part 3: Google Shopping Ads