

BLOG
Style an Unordered List Using CSS
Hopefully by now you have all read my blog on styling a select box. Well today I’m going to show you how to style an unordered list.
The Problem
Surprisingly, CSS doesn’t provide a straight forward way of styling unordered lists. There isn't any CSS for changing the colour of a bullet and the list style options are limited to disc, circle and square.
While there are plenty of ways to get around the limitations mentioned above, these often involve the use of background images or spans. The problem with background images is they don’t scale well responsively and spans need to be added into the HTML each time a <ul> is used. This is not ideal if the client is using a CMS and adding content to their site, as they will have to add the spans into the HTML themselves (or pay you to do it!)
The Solution
A nice clean way to style an unordered list is to take advantage of the CSS ::before selector.
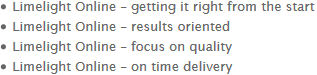
Below is your standard HTML for an unordered list. Note that when I apply CSS to the <ul> I only want to apply it to <ul>’s in the content area of the website. I don’t want to apply it to <ul>’s used for menus etc.
<div class=”content-area-container”>
<ul>
<li>Limelight Online – getting it right from the start</li>
<li>Limelight Online – results oriented</li>
<li>Limelight Online – focus on quality</li>
<li>Limelight Online – on time delivery</li>
</ul>
</div>
As you can see, there is nothing special going on here. All the magic happens in the CSS.
First I need to hide the default bullet and add some padding for where my new bullet is going to go.
.content-area-container ul {
margin: 0;
padding: 0 0 0 20px;
list-style: none;
}
Next I need to make sure my <li> is position relative so I can better position my new bullet.
.content-area-container ul li {
position: relative;
font-size: 13px;
line-height: 20px;
}
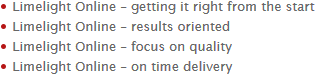
Finally I create my new bullet using the ::before selector.
For a bullet, I set content to nothing and use border radius to create a round bullet point.
.content-area-container ul li:before {
position: absolute;
background-color: #b61717;
width: 5px;
height: 5px;
border-radius: 50%;
content: “”;
left: -12px;
top: 8px;
}
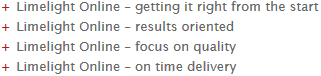
If I wanted to change my list style to a plus sign, I can make the following tweaks to my CSS:
.content-area-container ul li:before {
position:absolute;
color: #b61717;
content:”+”;
left: -15px;
top: 0;
}
Taking it to the next level!
If you want to create some really cool list styles I suggest using the iconic font and CSS toolkit called Font Awesome. Basically Font Awesome allows you to add scalable vector icons as you list style. If you want to learn more about this tool, please visit the FontAwesome website.
I’ll show you what it can do.
Let’s say I want a ‘thumbs up’ as my bullet list style: ![]()
All I need to do is set content to equal the CSS Rule for the thumbs up icon and set font-family to be FontAwesome. All the different CSS Rules for the different icons can be found here.
.content-area-container ul li:before {
position:absolute;
color: #b61717;
content:”\f164”;
left: -20px;
font-family: FontAwesome;
top: 0;
}

And there you have it, a nice clean solution to not only change the colour of an unordered list, but change the list style to something custom.
Hope you found this tutorial useful! Feel free to ask any questions in the comments area below. And stay tuned for my next instalment!

Related posts


- March 2024: Google algorithm update - A crackdown on low-quality AI generated content
- GA4 - Where to Start?
- Compulsory shift to Responsive Search Ads coming in June
- What are Google Ads keyword match types and how are they changing?
- How do I get my business to show up on Google? Part 3: Google Shopping Ads